Showing posts with label contributors. Show all posts

BEAUTY: SUMMER FOUNDATIONS

Hi Everyone! Monica here from beauty parler.  Hope you're all embracing the nicer weather. Although the weather has it's dips in temperature this time of year the hot sticky Summer days are coming! Which means sweaty makeup which can look caked on. Well, that's a definite no and can all be avoided by switching out your foundation to a more Summer friendly one.

On hot sweaty days, the last thing I want to do is wear any makeup. But on days that I head out to work or attend beauty events, I like to wear a little makeup. Makes me feel more polished and put together. Anyone else feel like that too? Here are three of my Summer must-have foundations.


1/NARS All-Day Luminous Weightless Foundation | 2/MAC Face & Body Foundation | 3/Maybelline Dream Wonder Fluid Touch Foundation

In general, all three of these are similar in texture. Light-weight, watery, and build-able coverage. With formulas so watery those with drier skin types will find that they'll need to apply a good moisturized base or can emphasis dry patches. These formulas work wonderfully for those with oily to combination skin types. The NARS All-Day Luminous Weightless Foundation and the Maybelline Dream Wonder Fluid Touch Foundation are a semi-matte to matte finish. Whereas, MAC Face & Body Foundation has a dewier finish and those with drier skin types will like this foundation better than the other two.
In terms of application because these are so watery they are best applied with your fingers or foundation brush. I'd suggest not using a beauty sponge as it would just absorb too much product.

I hope I helped you start your Summer makeup routine. Share your favourite Summer makeup?


-post by monica
Google+ Pinterest

DESIGN: BEAUTIFUL BOOK SHELF ACCESSORIES

When it comes to storage at home, we can make it just storage or create a beautiful space to display our books, art and home decor and add a little personality to our space. There is so many stylish bookshelves on the market to chose from and when styled, they'll bring a totally new look to any living room! I personally love bright and colorful bookshelves, full of accessories, personal items and vintage finds, a statement element of the room.

Here is one you might get inspired by and some happy home decor ideas below!

/7/ Barneys /8/ Chairish /9/ Habitat /10/ Amara


- post by Monika Boruch
Google+ Pinterest

Design: Get her stylish living room

Hi there! Monika here bringing you today's dose of design! I love to take a sneak peak into other bloggers/designers' houses, home tours are such a great source of inspiration! Who doesn't right?? This is definitely the case of this gorgeous living room belonging to Nicole Gibbons from So Haute blog!  I love her eclectic, elegant apartment, full of vintage finds and beautiful vignettes! You can see the full tour here and get the style below!


For a similar look & feel to Nicole's space, here are a few home items I'd recommend!
Google+ Pinterest

FOOD: S'mores for TWO

Hi guy! Jen from Lemon Drop Love here. We are in the month of love and Valentines Day is creeping up on us. Today, I wanted to share a version of one of my favorite sweet treats—s’mores! But this time you get to share it with your special someone and get a little messy in the process.


S’more For Two
INGREDIENTS:

1 cup semi-sweet chocolate chips
Graham crackers for dipping
1 small skillet
 Get this one at Sur La Table or others via Madyson's Marshmallows or (or extra large marshmallows cut in half)
Heart-shaped cookie cutter

DIRECTIONS:
Preheat the oven to 450.
In a small cast iron skillet, add chocolate chips. Take each Maddy Melt and cut into heart shapes or cut the large marshmallows in half and top the chocolate chips with them.
Once the oven is up to temperature, add the skillet to the oven. Bake for 7-9 minutes, or until the marshmallows turn golden brown.
Serve with graham crackers for scooping.


-images and recipe by jen costea
Google+ Pinterest

DESIGN: Glittery Accents

Hi, it's Monika here, ohmydeco! If you love interior design, I am sure you know stunning home tours features on the Glitter Guide! My recent favorite is this chic and eclectic apartment belonging to the editorial director of the very same website - Caitlin Moran. The space is kept in neutral color palette with metallic accents and subtle pop of colors all around! And I simply love the glittery accents, making the space fun and girly! 

For the full tour click here


Google+ Pinterest

DESIGN: Bathroom Tiles

Hi lovelies, Monika here from ohmydeco! I am currently obsessed with beautiful decorative bathroom tiles, you surely did see them all over pinterest! My favourite are the honeycomb shaped and geometric patterns paired with shiny accessories and wood. My future bathroom with definitely look a lot like those below!!


Pictures from the top left: 1 via pinterest // 2 via pinterest // 3 via Chicdeco // 4 via pinterest

// 6 Cabinet via Houzz // 7 ABC Home Rug // 8 ABC Home Towels //


-post by monika boruch

 
Google+ Pinterest

BEAUTY: SUMMER BEAUTY

With summer in full swing, it's time to roll out the seasonal beauty products. Summer brings warmer weather and a full social calendar, which means we all want to look our best. But beating the frizzy hair and raccoon eyes become quite the challenge in the heat. Here are a few of my picks for summer hair and beauty- what are yours? 


Vita Liberata Rapid Tan Mousse- Tan the safe way this summer and get a realistic, bronzy glow with the help of this product.  This mousse works in as little as one hour and continues to develop, allowing you to choose your desired depth of tan that lasts for four to seven days. The bottle promises zero smell, so there's no worries about your faux tan being any less of a secret.

Formula X Electrics Nail Polish- This summer orange shade ("Oomph") looks great on either nails or toes- or both! This vivid shade goes on smoothly and evenly and resists chipping.

Alterna Caviar Anti-Aging® Replenishing Moisture Milk- Summer can take a toll on your hair- UV rays, chlorine and a few skipped days of brushing (oops) are all common culprits. This leave-in conditioner works to hydrate deeply to treat dry, brittle, or aging hair. Your hair will feel silky smooth after just one application.

Fresh Sugar Lip Treatment SPF 15- Finding a pretty lip balm that contains SPF can be hard, but this one does the job. Choose from a variety of shades- I love the coral tinted version- for just a touch of color.  Vitamins A, C, and E provide protection from wrinkles and UV rays.

Benefit Cosmetics BADgal Waterproof Mascara- There's nothing worse that messy mascara that melts in the heat. This Benefit classic is reinvented in a waterproof version to stop just that. The dark black color adds thickness to each and every lash.


-post by rachel maleady


Google+ Pinterest

FASHION: HOT TO wear a blazer

Hi MBG readers, Sandra from Blasfemmes here.   I really love blazers. They’re in fact a key component of my wardrobe for their versatility and elegance and I especially love how can they turn a casual outfit into a more polished one. This time my post is about two different ways of wearing a soft pink tone blazer. These are just two ways but the options are endless. Are there more blazer's fans out there? Have a great week everyone! Post MBG-How-to-wear-nude-blazer

First Look: 1. Ray-Ban Sunglasses // 2. Topshop Blazer// 3. M&S Scarf // 4. Topshop Playsuit // 5. Pour La Victoire Sandals Second Look: 1. Topshop Blazer // 2. Equipment Top // 3. Frame Denim Jeans // 4. Valentino Rockstud Bag // 5. Giuseppe Zanotti Shoes (similar here).


 -post by sandra lopes

 
Google+ Pinterest

FASHION: DRESS SEASON

Hi everyone, this is Sandra from Blasfemmes. Dress Season is officially here and there are lots of gorgeous dresses to pick from, from pretty day styles to glamorous cocktail designs. A dress can be the perfect outfit for most occasions, it's just a matter of picking the appropriate style. From the below selection, I'm especially in love with Rachel Pally's maxi white dress for a casual situation and Shoshanna's nude lace dress for a special occasion. What about you? Have you spotted any you like? Have a great week everyone!


Maxi Dress: Shoshanna Pink Maxi Dress (top) Rachel Pally Maxi Dress (bottom) // Little White Dress: Dolce Vita Lace Dress (top) Diane von Furstenberg Lace Dress (bottom) // Casual: Current/Elliott Overall Dress (top) Soft Joie Dress (bottom) // Wedding Guest: Shoshanna Lace Dress (top) Alice + Olivia Dress (bottom) // Holiday Ready: d.RA Dress (top) Mara Hoffman Maxi Dress (bottom)


 -post by sandra lopes

 
Google+ Pinterest

FOOD: Cinnamon and Sugar Palmiers

Hi there, Amanda here from A Life Well Lived. Today I am sharing one of my super simple and super delicious entertaining secrets - puffed pastry. Store bought puffed pasty is a godsend. It is versatile, easy, and always delicious. I love to use it both in sweet treats and savory dishes- so I always keep a box in my freezer just in case. Today I am sharing with you my easy puffed pastry recipe for the French cookies - palmiers.


I  love palmiers because they remind me of elephant ears I used to get at the country fair growing up. Elephant ears were huge (huge!) pieces of fried dough topped with mounds and mounds of cinnamon and sugar.


These palmiers are a little more sophisticated and instead of frying the dough, layers of sweet puffed pastry are baked until golden and crispy.


My choice in puffed pastry is Dufor Brand from Whole Foods. I know it is a little more expensive than the Pepperridge Farm version, but the reason I like Dufor is that it uses real butter. But if Pepperridge Farms is easier for you - no worries - I promise your palmiers will be just as delicious.


There are so many different versions  you can make these palmiers. Right now they are sweet palmiers stuffed with cinnamon and sugar but you could also add in lemon in place of the cinnamon to make them light and refreshing. Or maybe brown sugar and cardamon.  I like recipes that are versatile and can be amended pretty easily depending on what I want. These puffed pastry palmiers are just that.


You don't have to keep them sweet either. You can make savory palmiers by using parmesan cheese and an herb like thyme or rosemary or maybe get crazy and add in proscuitto and djion mustard. The possibilities are endless. So if you like to entertain try these palmiers  - you can make them ahead of time and bake them off just as your guests arrive.


INGREDIENTS & HOW TO MAKE:

1 box puffed pastry such as Dufor Puffed Pastry 
1/2 cup sugar
1 teaspoon cinnamon
Make sure to defrost puffed pastry in the refrigerator  2 -3 hours (or overnight) before making these cookies.
Preheat oven to 400F.
On a well floured board or countertop, unfold puffed pastry and roll out to a 13 x 15 rectangle. Combine sugar and cinnamon and spread over puffed pastry in an even layer. Beginning at the shorter end of the rectangle roll in the puffed pastry until you reach the center. Repeat on the other side of the puffed pastry.  Cut 1/4" cookies out of the dough and place on a baking sheet.
Bake for about 10 - 12 minutes or until palmiers are browned and sugar has begun to caramelize.


have a nice weekend!!!!


-post by amanda frederickson smiley

Google+ Pinterest

DESIGN: CHIC CHINOISERIE

Hi Made By Girl readers, it's Stasia with Primp & Prime. I love adding a bit of Chinoiserie to a space, whether it be a blue and white printed pillow, pagoda wallpaper or a porcelain ginger pot. Chinoiserie is not only chic, it adds a bit of exotic sophistication that will never go out of style. Check out a few of my favorite finds...


1. White Chandelier 2.Wallpaper 3. Bamboo Mirror 4.. Bamboo Coral Armchair 5. Bamboo Lantern 6.Bamboo Pillow 7. Chinoiserie Printed Pillow 8.Lamp 9. Foo Dogs 10.Orange Chinoiserie Pillow11.Bamboo Gold Table 12. Jars 


Photo Credit In Order (Domino, Harper's Bazzar, House Beautiful)
 

-post by anastasia

Google+ Pinterest

DECOR: ABC HOME

Hey there, it's Monika here from ohmydeco! You probably came across the ABC home website before, it's one of my favorite online destination and a real treasury full of beautiful home decor finds. From luxurious rugs, through stunning sofas and printed scatter cushions, to wooden side tables, the collection will make all decor addicts sight..   I put together my favorite items for you and it happened to create a lovely living room layout as well!


1 // 2 // 3 // 4 // 5 // 6 // 7 // 8 // 9 // 10


-post by monika boruch


Google+ Pinterest

FOOD: crème brûlée

Hi there Made By Girl readers, Amanda here again from the blog A Life Well Lived. Today I am sharing a super easy, super delicious, and naturally gluten-free dessert - my cardamom vanilla crème brûlée. 


More and more I find friends and family not eating gluten or at least trying to limit it (myself included).  But that doesn’t meant they can’t have dessert! So I am always on the lookout for desserts, or any food for that matter, that is naturally gluten free. This crème brûlée is perfect. Using only egg yolks, cream, sugar, and natural flavorings - an ounce of gluten never touches this dessert. 


Plus I love the way it smells and tastes. Cardamom and vanilla are such a great combination. The warm vanilla compliments the spicy cardamom making a unique and delicious dessert. But best part about this creme brûlée is that it can be any flavor that you want. If you want cinnamon, just replace the cardamom and vanilla bean with a couple cinnamon sticks and let that steep in in the milk and sugar. Or what about coffee - just use to some crushed coffee beans. Or how about orange zest or mint or even basil. The list could go on. I am going to stick with vanilla and cardamom but feel free to play around with new flavors.  

And of course a highlight to this dessert is the crunchy burnt sugar on top. If you don’t have a blow torch, you can use the broiler in your oven. 


Cardamom Vanilla Crème Brûlée


5 egg yolks


2 1/2 cups heavy cream

3/4 cups sugar, plus 6 tablespoons, separated  
1/2 vanilla bean split in half and seeded 
3 crushed cardamom pods 
pinch of salt


Preheat the oven to 325°F and arrange the ramekins on a rimmed pan. 

In a medium saucepan over moderately high heat, combine the heavy cream, 1/2 cup of the sugar, the vanilla bean and its seeds,cardamom pods, and the salt.  Bring to a boil, stirring to dissolve the sugar. Once sugar is dissolved, bring mixture to a low simmer and simmer for about 30 minutes. 


While the cream is heating, combine the egg yolks with the remaining 1/4 cup of sugar and whisk to combine. When cream mixture is ready, gradually add about 1/3 of the hot cream mixture to the yolks, whisking constantly. Once fully combined and the eggs are tempered, add the remaining hot cream mixture and stir to fully combine. Strain the custard through a fine-mesh sieve into a clean container. Carefully ladle or pour the custard into the ramekins, filling them to the rim.


Place the pan in the oven and carefully pour enough hot water into the pan to come halfway up the sides of the ramekins. Bake until the edges have set but the center still jiggles when the ramekin is gently shaken, 20 to 25 minutes.


Remove the ramekins from the water bath and let cool on a rack for 30 minutes then wrap individually and refrigerate for at least 3 hours.


When ready to serve sprinkle the top of each custard with a thin even layer of remaining sugar, using about 1 tablespoon per ramekin. Use a kitchen blowtorch or the broiler to evenly melt and caramelize the sugar. Serve immediately.


-post by amanda frederickson


Google+ Pinterest

BEAUTY: Frizz Busters


Everyone has something that they do not like about their hair, for me—it is frizz. And in my case, my “frizzy” hair is the byproduct of damaged, porous hair that has stretched and then broken off.

Unfortunately, there is no reversing this damage, but it can be made less noticeable by using the right product. The right product will temporarily seal the ends and will use ingredients that smooth the hair shaft by coating it and making the hair lay flat.

I am currently using the Monoi Repairing Anti Breakage Spray from the Carol’s Daughter haircare line, which I was introduced to at the Lucky FABB conference. It is a wonderful product and really helps with the detangling which is one of the first steps in preventing further breakage. I also included the Monoi Repairing Split End Sealer. I have not used this product yet, but based on the one I am currently using, I do plan on purchasing it.

I am also considering the Caviar Perfect Iron Spray, it is supposed to protect hair up to 450 degrees and if you are like me and have to blow dry and flat iron your hair on a daily basis, a product that protects it from heat is a must have. The Hot Toddy Heat Protecter by Drybar has also piqued my interest. I like that this product helps to reduce friction, because friction will also make damaged hair look more frizzy. I discovered this when I use to curl my hair by wrapping it around the barrel and not using the clamp. Curling your hair using this method causes it to slide up and down the the barrel, which is more or less like rubbing it against the barrel — and we all know what happens when you rub your hair on a balloon—not pretty! But a product that helps cut down on friction will certainly help with the appearance of frizz.

And the Climate Control Gel by Ouidad, this I must try. A gel that combats heat and humidity? Bring it on! I live in New York which is famous for it’s hot, sweltering, and humid summers. So come next June I will be adding this to my shopping list for sure. Finally, The Full Thickening Cream by Living Proof is a product I have used in the past, it is very light and has a wonderful scent—not too sweet. It helps by adding volume and coating the hair shaft. Damaged hair is generally thinner then healthy hair due to breakage, so a thickening cream can definitely be a big help. Well I hope this helps you bust your frizzies!


- post by alicia


Google+ Pinterest

DESIGN: Inspired by Goethe

Hi everyone, its Lisa with Gem Daily! When I first came across these gorgeous doors at the Goethe Institute in Prague, I couldn't get them out of my head- so stunning, so detailed and all together amazing! I am so drawn to that perfect hue of peach/salmon/heaven, combined with the brass. With these doors glued to my brain, I found myself shopping for goodies with similar traits, whether it be the color, finish or detail and I discovered this can be the most fun way to shop for things.

First, find a source of inspiration that you gravitate toward-whether it be an architectural element, a piece of art or something as small as a detail on a handbag. When that sucker gets engraved in your brain, you'll find it's actually really easy to pull elements or aspects of the inspiration and help it guide you in shopping for inspired gems. In my case, it was the color of salmon, the brass and the handcrafted detail.

Check out my finds that are inspired by this amazing set of doors in Prague and next time you're in a design rut, use a source of inspiration to help guide your shopping!


1 // Milo Baughman Lounge Chair
2 // Valdes Chair 
3 // X Marks the Spot Rug, Adobe
4 // Robert Abbey Delta Petal Table Lamp
5 // Gorka Mirror
6 // Pink Sea Urchin
7 // Maitland Smith Tesselated Coral Console Table
8 // John Robshaw Laal Decorative Pillow
9 // Izmer Hammered Brass Transitional Cocktail Table


-post by lisa fisbeck


Google+ Pinterest

....& the contributors are

Welcome ladies! 

Thank you for much for all the submissions, unfortunately we couldn't email everyone back, there were too many.  We still haven't decided on the 'Food' category yet & we'll be keeping the current 2 fashion contributors on the blog. Because of this, we are not accepting anymore Fashion contributors at this time.  If your name is listed below, please email us asap. Thanks & look forward to working with you! 


-image by Jen Ramos


Google+ Pinterest

Contributors Wanted


The time has come again! Contributors are such a joy to have at MadeByGirl & we are now looking for a few good ones! Love to see beautiful posts, don't you?  Time to switch out the current contributors & bring in FRESH FACES & posts! I'm usually busy managing my MBG Shop, painting for my Cocoa & Hearts gallery, marketing, answering e-mail & maintaining my personal life.  Looking for new contributors to start around  February 1st or 15th!!!!
 

I'd love to recruit 5-6 contributors to blog here on Made By Girl!  It's not going to be an easy task - but I'll choose bloggers for each category below.  Categories are:
 
  • Decor/Interior Design
  • Fashion
  • Beauty
  • Food


Below I've outlined the details:
HOW OFTEN WILL YOU POST: 
1-2x per month for 6 months.
 
EXPERIENCE:  

Yes - Must have an active/updated blog. I'm looking for bloggers who have some knowledge of programs like Photoshop & have a 'similar aesthetic' as Made By Girl. The posts you write for MBG cannot be posted on your own blog, but you can link to it from your blog.


WILL THERE BE COMPENSATION: 
Not at this time. But it's a great chance to gain more exposure & collaborate with MBG blog. I will also gift a LOVE print to all the new contributors who are chosen!
 
BIO PAGES: 
We'll be adding a page with photos & short bios of all the current contributors - here's an example. .

RESOURCES: 

It's very important to credit 'all' images properly.


PRETTY POST PLS: 
I love pretty & interesting posts. So pls put some LOVE into it! 

FASHION BLOGGER SUBMISSIONS
 I will need some collage-style posts from you, NOT all outfit posts. 


HOW DO YOU SUBMIT: 
If you you want to submit, email here  & let us know 'which category' you're interested in. Write 'Contributors' in the email subject pls. ALSO, pls email me your blog so I can see your style! If you submitted last yr. don't be afraid to submit again! 
   
WHEN WILL WE SELECT CONTRIBUTORS: 
If you don't hear from someone at Made By Girl in about 2-3 weeks from this post, it means someone else was selected.  Unfortunately, we may not be able to respond to everyone. We will post the selected contributors in an upcoming post!


Thanks & looking forward to hearing from you! 


Google+ Pinterest

FOOD: Herbed Rice Bowl with Poached Egg & Radish


Poached Egg, Radish & Feta over Herbed Rice | perpetuallychic.com

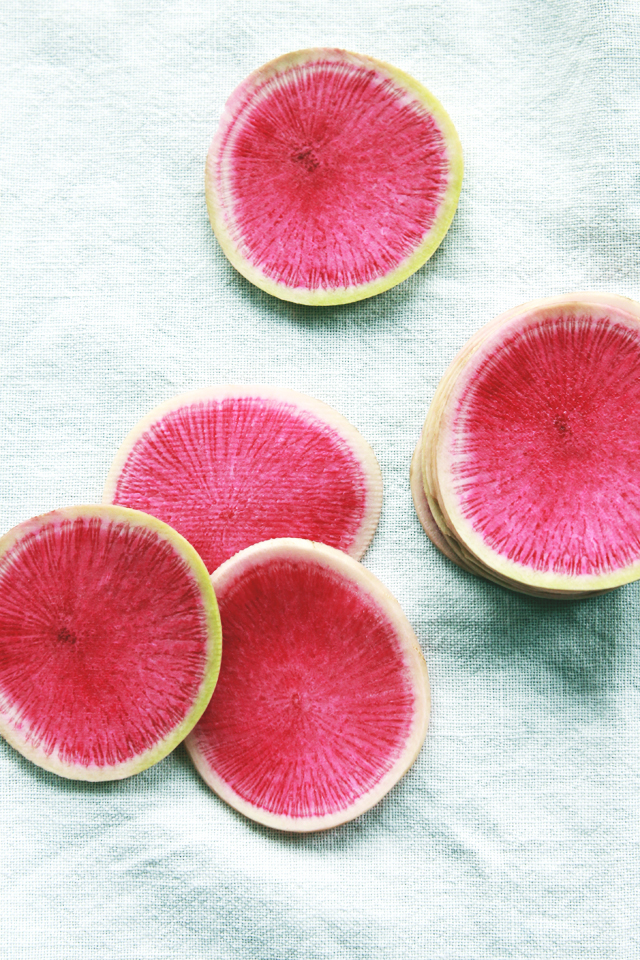
Hi everyone! Lauren dropping in today with a recipe that's perfect for cozy weekend mornings at home this fall. This hearty and healthy dish was actually inspired by a photo I saw in my Instagram feed of someone's brunch at a restaurant in L.A. Even though I hadn't tasted the original, the combination of ingredients in that photo looked right up my alley, so I knew I had to try recreating something similar. I also love picking up watermelon radishes this time of year--they can be hard to find but basically have the same peppery taste as regular radishes.

They're BRIGHT PINK inside and just way too pretty to pass up. Just goes to show that whether on Instagram, at a restaurant or at the farmers' market, you never know where inspiration will strike!
 
Poached Egg, Radish & Feta over Herbed Rice | perpetuallychic.com

Poached Egg, Radish & Feta over Herbed Rice | perpetuallychic.com 
Ingredients:
2 cups of cooked brown rice
1 cup fresh herbs (parsley, mint, cilantro)
Extra virgin olive oil
Crushed red pepper flakes
Kosher sea salt and freshly ground black pepper
Lemon juice
1 large watermelon radish or 2 regular radishes, sliced thinly on a mandoline
2 eggs
Fresh chives, chopped
Fresh feta cheese, crumbled


Poached Egg, Radish & Feta over Herbed Rice | perpetuallychic.com


Instructions:
1. Place herbs in a small food processor. Drizzle with olive oil and sprinkle with salt. Puree into a thick pesto, adding more oil if necessary to combine. 
2. In a bowl, combine the warm rice and the herb pesto. Mix well with a spoon to evenly coat the rice with the pesto. Season with red pepper flakes, salt, black pepper and a quick squeeze of lemon juice. 
3. In a small pot, bring water to a boil then reduce heat to simmer and add a splash or two of vinegar. Crack each egg, one at a time, into a small bowl then gently slide the egg into the pot. Cook for about 2-3 minutes, then carefully scoop the eggs out with a slotted spoon. 
4. Divide the rice between two bowls. Top each with the radish slices, then a poached egg. Sprinkle with the chives, feta, salt and pepper. 


*Photos and recipe by Lauren Craig


Google+ Pinterest

BEAUTY: FALL NAIL COLORS

Hi MadeByGirl readers! Kelsey here from Kelsey Nicole. If there is one thing I love more than fall clothes, it's fall nail polish colors. I love experimenting with different deep shades, or if all else fails, I reach for classic black. Here are a few shade's I am excited to try this season:
 

What nail colors are you excited to wear this fall?


- post by kelsey


Google+ Pinterest

FOOD: Zucchini & Lemon Breakfast Bread

Hello! Lauren from Perpetually Chic here today, sharing a recipe from my mother-in-law’s kitchen to yours. You’ve likely noticed at the market that zucchini is in season? There are millions of ways to use your zucchini, but one of my favorites is this zucchini-lemon bread. It’s perfectly moist, not too sweet, and has just a hint of lemon for a fresh twist—I love eating this bread with coffee in the morning, but it’s also VERY hard not to sneak a piece as an afternoon snack, too! Keep reading for the recipe…

Zucchini & Lemon Breakfast Bread | Perpetually Chic for Made By GirlZucchini & Lemon Breakfast Bread | Perpetually Chic for Made By Girl


Zucchini & Lemon Breakfast Bread
Ingredients:

3 cups of all-purpose flour
3 teaspoons of cinnamon
1 teaspoon of baking soda
1 teaspoon of baking powder
1 teaspoon of salt
3 eggs
1 cup vegetable oil
1 cup sugar
3 teaspoons vanilla extract
2 cups grated zucchini
Zest of half a lemon + juice of half a lemon
1 cup chopped walnuts


Zucchini & Lemon Breakfast Bread | Perpetually Chic for Made By Girl


Instructions:

1. Grease and flour two 8x4 inch pans or two muffin tins. Preheat your oven to 325 degrees F.
2. In a bowl, combine shredded zucchini, lemon zest, lemon juice and chopped walnuts. Set aside.
3. In another bowl, sift together the flour, cinnamon, baking powder, baking soda and salt. Set aside.
4. In a third bowl, beat eggs, oil, vanilla and sugar together until well combined.
5. Add your bowl of sifted ingredients into the egg-sugar mixture and mix well. Stir in the zucchini-lemon-nut mixture until everything is combined. Pour the batter into the prepared pans or muffin tins.
6. Bake for 40 minutes to an hour, until a toothpick inserted in the center of your bread or a muffin comes out clean. Time will vary based on whether you use the bread pans or muffin tins. Let the pans or muffin tins cool on a rack for 20 minutes…if you can!
7. If you want to freeze the second loaf or some of the muffins, just wrap them individually with Saran wrap and place in a freezer Ziploc bag. To thaw, just let sit on the counter until they come to room temperature.


*Photos and recipe by Lauren Craig

Google+ Pinterest