Showing posts with label DIY.. Show all posts

BEAUTY: DIY LIPSTICK PALETTE

Hey everyone! Today, I wanted to share a little something I learned. 

During a photo shoot last year,  I noticed my make-up artist, Mayela Vazquez using a makeup palette with lots of colors for my lips. At first, I didn't know what to think. It looked like a painter's palette and a bit MESSY...Hmmm. I knew she did AWESOME work, so I wondered in silence where she got this palette from. 

When she was finished applying my lip color - I looked in the mirror & WOW! They looked fabulous & smooth! Perfection!  I somehow knew this palette (& her skills) had something to do with this. I asked her where she got the palette from...& this is what I learned from her.


After she told me, I decided to DIY this. So, if you want smooth, neat, long-lasting color..... keep reading.

  • Buy an empty make-up palette.  I bought the 35 well-pro lipstick palette from The Tanning Store.  It has 35 deep compartments, 14 large & 21 medium. This particular palette also includes a white center divider attached with a long hinge. The brand is by MITSUYOSHI. 
  • Purchase several of your favorite lipstick shades. I haven't filled up the palette yet, but I plan to. Right now I have about (12) of my favorite shades. From brands like Nars, Yves Saint Laurent, Burberry, Bobbi Brown, MAC, Givenchy & more. 
  • Once you purchase all the lip color,  add one color at a time by slicing the lipstick into rounds. It's easier this way, trust me. Maybe cut 2-3 rounds at a time into the palette compartment of your choice. The reason for starting off with 2-3 slices of lipstick color is because it is easier to mash the lipstick into the compartment with fewer rounds.  You can use any flat or rounded object to mash the lip color.  This part can get messy if you rush it. So, be patient & make sure your mashing object isn't too large.. 
  • Continue down the lipstick & cut 2-3 more slices off.  Repeat the mashing into the palette. Once a lip color is done, feel free to move onto the next lipstick shade. 
  • Once you have all your colors in the palette - it should look somewhat like mine - you can start testing it out on your lips. 
  • For trying the shades -  I recommend using a lip brush like the Sephora Pro Lip Brush #81 or the Make Up Forever #302 Precision brush.  Folks, using a brush to add color to your lips makes a HUGE difference!!  For one, the lipstick appears to look neater & your lips look more defined. Also, the color seeps into the lines in your lips & that allows the color to remain on your lips longer!!  Trust me, once you try this -  you will not turn back. 
  • A benefit of using a make-up palette for lipstick color is that it allows you to mix & match colors.  I've found that having all my shades available to me (at the same time) makes it easier to blend the perfect color for my lips!
  • Another item I added to my palette was lip gloss. I love Tickled Pink by Lancome it adds the perfect finishing touch to my lipstick!

-post & images by jen ramos

Google+ Pinterest

Desk Shopping

Sooo....we'll be moving NEXT month to another apartment & I'll also be looking for a new desk for my studio. I really want gold legs on the new desk, and I am contemplating whether to go the DIY route by painting the legs gold, or not.  A DESK with drawers is also ideal, and although option a & f are super cute, I'm always opening & closing my current desk drawers...so, to avoid standing up all the time, drawers are top priority.

It needs to be sturdy & not feel cheap. Since I'll be using the desk everyday, it would be smart to invest in something good that will last! Same goes for a desk chair....agree??

I'd love for you to help me choose, which is your fave?

a. wayfair


-post by jen ramos


Google+ Pinterest

DIY: studded shirt

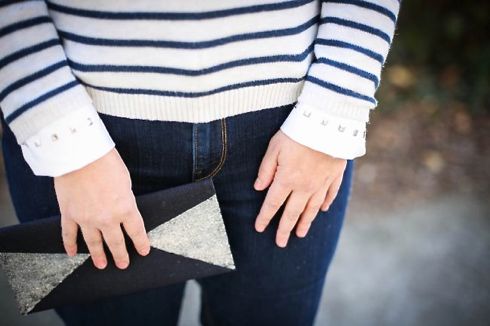
DIY Studded Shirt Hi! I'm Stephanie from Henry Happened, and I'm excited to share fashion DIYs here on MBG as one of the newest contributors. If you have ideas on DIYs that you'd like to see, definitely let me know! For our first project, we're updating an everyday basic - the white button up!

DIY STudded Shirt 

When it's cold outside I am a big fan of layering. At any given time I'm usually wearing about three shirts! So I like my layers to have a little pizzazz. An easy way to spruce up a plain button up is with studs. This DIY Studded Shirt is simple (no prongs to stick your fingers!), chic and easy on the wallet too.

Fair warning: Iron on studs are a little addictive. They're so easy you'll want to stud everything! And before you know it you'll be half way to buying a Harley. 

iron on stud tutorial 

You will need:
  • A plain button-up shirt. I like the look on a white shirt but it would also look great on denim.
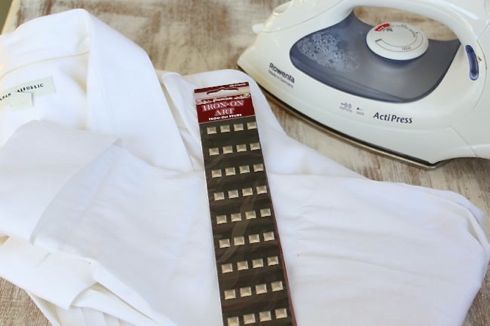
  • Iron on studs. You can find these at any craft store.
  • An iron
DIY Studded Shirt
DIY Button-up Shirt with Studs 

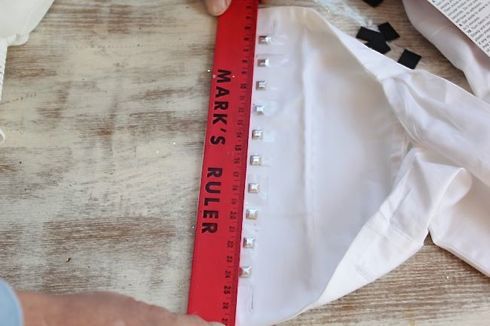
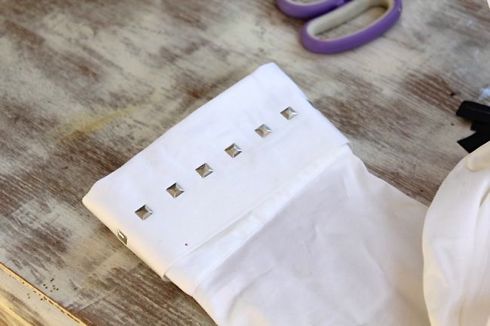
Start by cutting the studs into individual pieces. Then remove the black backing (but not the top plastic!) and place them evenly along the middle of your sleeve cuffs.

 Iron on Studs 

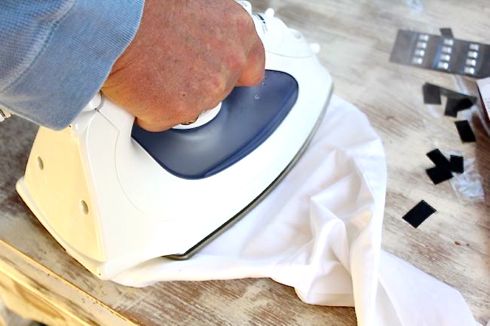
Then carefully flip over the sleeve so you don't mess up the placement of the studs. And iron according to the package directions. 

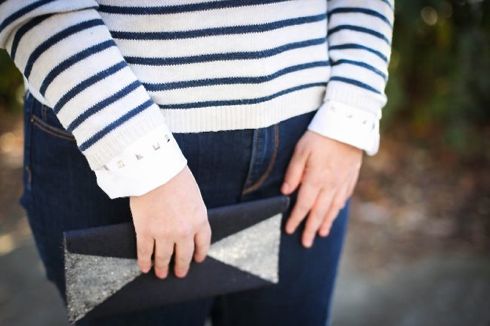
Studded Shirt Cuffs 

When the studs have cooled (trust me they're hot!) you can peel off the plastic on top. That's it! 

DIY Studded Collar 

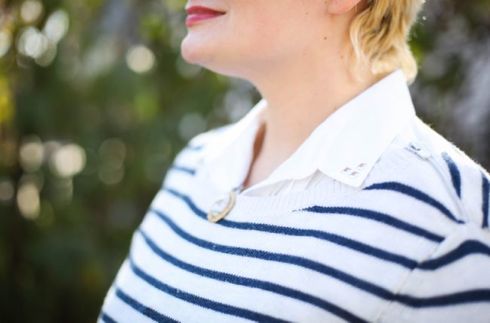
 I also added three studs to my shirt collar. Again, all you do is stick them on the fabric in the pattern you want and iron them on. So easy!  

Are you a fan of studs? What would you put them on?
Google+ Pinterest

DIY: Pouf Pin

Hello everyone! It's Anna here, and today I'm sharing a simple project that will add a soft, feminine and playful element to your outfit: a pouf pin. If you're not into complex DIY projects, this is perfect! First off, you'll need your pouf material, scissors, and a large safety pin. Your pouf material can be whatever you want it to be… mine will be made of hot pink tulle.

I folded my tulle back and forth, making about 8 inch folds. 

I then cut slits in the shape of V's in the center of my tulle. 

I knotted a separate strip of tulle around the bundle and through the V's. 

Keeping my knotted pieces separate, I trimmed the edges back so that there were no loops and each piece was the same length. I prefer to cut my edges in a zig zag. This gives the pouf more of a flower look and simulates the shape of petals. 

Separate, twist and fluff. 

Take the knotted pieces and tie them around the back side of a safety pin. 

Pin and wear.


 -images and post by ann weaver


Google+ Pinterest

DIY: Neon Necklace

Hello Made by Girl readers! Jenny May here from The Swede Records this Monday bringing you another fun n' easy DIY!! 


With Coachella just around the corner, I wanted to make a light weight necklace that really stood out and made a fun statement.  I absolutely love bright colors and when trying to make something unique, you really can't go wrong with spray paint!


I simply traced a triangle on the plastic canvas, cut the shape out, and spray painted the piece on newspaper with neon spray paint. 


I then slid the chain through a tiny square in the middle of the triangle. 


 Et voila, under 5 min! I plan to do another with neon pink. : )


-images and post by jenny may 


Google+ Pinterest

DIY: Festive Welcome Mats

Happy Valentine's Day Made by Girl readers! Jenny May here popping over from the Swede Records once again to give you a quick n' easy DIY project.  

One of my oddly favorite home fixations are festive welcome mats.  They're a fun way to show off your personality as guests arrive and really make a statement before you even open your door.  My Mom was always one to decorate our home for every occasion, even on Valentine's Day so it kinda stuck with me.  
 
This year, I decided to throw a little Champagne Party for friends on Vday so I've been thinking of little ways to decorate.  With my love for Spray Paint and doormats, this DIY was the perfect addition that took under 10 minutes to make. 


Because the door mat I bought was so dark, I chose white as the base color so the red hearts would easily stand out.  I started off by spray painting with several white coats until the whole mat was evenly white.  


 I then took the heart stencil, carefully placed it over the mat, and generously sprayed the center with the red can.  


Once complete, I let the mat dry for 48 hours before stepping on.


I plan on making one of these for Saint Patrick's Day, Easter, and the 4th of July but next time I will use a bristle mat! If you all decide to make one of your own, be sure to send them to Jen or myself!


-post by jenny may
Google+ Pinterest

DIY: Rope Bracelet


Hi everyone! It's Jenny Bevlin bringing you another DIY post. I love accessories, but I especially love jewelry! I've noticed lately that I have been buying a lot of bracelets and even making some myself. I find that making my own accessories is very rewarding. It's fun and you will love all the compliments you receive when you say you made it yourself! What you need to make this bracelet:
  • Hot Glue Gun
  • Flat Nose Pliers
  • Scissors
  • Rope trim
  • Jewelry Jump Rings
  • Jewelry Lobster Clasp
  • Jewelry Ribbon Endings


Steps: 

Measure the rope around your wrist leaving about an extra inch longer than your wrist. Cut the rope. Make sure you add a dot of hot glue to the end of the rope you just cut to keep it from unraveling.
Cut 3 more strands the same length as the first strand. Make sure to add a dot of hot glue to ends of the rope each time you cut it.


Lay out the rope as shown in the photo above.


Overlap the rope as shown in the photo above.


Pull the end of the top rope under and up through the bottom rope.


Pull the ends of the rope tight.


Trim the ends so that they are all the same length. Make sure to add hot glue to the ends to keep them from unraveling.


Put the rope ends into the ribbon ending and close with the pliers.


Use the pliers to add the jump rings and lobster clasp.


- post and images by Jenny Bevlin


Google+ Pinterest

Michaela's Bedroom Re-do....

Michaela Noelle a lifestyle blogger who recently re-did her bedroom has agreed to share it with us here at Made By Girl! It's a very girly looking room & from the looks of the before pics, she did a fantastic job! 


She describes the whole process below in her own words...


Dresser: I found the dresser at a local consignment store, and upon purchasing, it just had plain green and blue drawers.  I new the shape was right for what I wanted to do with it, so I packed up the little kids dresser and began a major transformation. After measuring and taping out the chevron pattern, I painted it with the same grayish/lavender as the walls.  A few knew knobs were really the vintage-charm cherry on top .


Desk: I was so excited to find this desk and chair at the Fremont Market in Seattle. After talking to the man I bought it from, I learned both the desk and chair are actually old classic vintage finds he hunted down from an old consignment shop before refinishing them.  I love knowing the desk comes with lots of history! 


I added some necessary desk supplies arranged in an Anthropologie mug, sitting on top of one of my favorite decor books, Shabby Chic Interiors by Rachel Ashwell. To finish it off, I threw in a few contemporary elements like the desk lamp and mini crystal chandelier.


Bed: I'm obsessed with light, bright bedding, accompanied by some serious pillow action. While I needed to keep the duvet cover I bought freshman year of college (mom's rule!), I was able to spice it up with a pile of fun textured pillows. Behind the bed, I hung some DIY art. All my favorite magazine pages are on one canvas, just to ensure I think, eat, and dream about design 24/7.


Rugs: One trend I've been seeing more of lately is the layering of rugs. Since the floor is cold (and ugly!) tile, I needed to cover them up.  First I laid down the neutral chenille jute rug, then threw the purple and black shag rug over it at an angle. I think it adds great texture and dimension to the room and visually creates a separate office area.


Closet: Yes, I had to purchase a closet for my room! I'm living in the old dining room of the house, so it lacks a place for clothes. Big problem for this California girl (: My goal for my room was to fill it with pieces of personality and character, therefore, I didn't want to purchase anything from a "normal" store like Target, IKEA, or the like.  My only exception was my closet. Can you guess where it's from? IKEA! It's so shabby chic for them, I almost had a heart attack.  After replacing the standard knobs for some Anthro ones, I'm loving the look.  I don't even think you can tell it's from IKEA!


Bookshelf: The bookshelf has been in my family for years. My great grandma passed it down to my brother and I, and when I moved to college, I snagged it.  A little white paint and some styling with school books, a lantern, and mercury glass owl completes the family antique.


Resources :

Desk, chair, bookcase at end of bed, turquoise box & mirror- Fremont Farmer's Market (Seattle, WA)
Closet- Ikea, Knobs- Anthropologie
Chevron dresser- Mosaic Consignment (Seattle). Knobs- Meadow Boutique (Seattle) & Anthropologie
Small white bookcase- My great grandma's
Bedding- Pottery Barn
Pillows- Pottery Barn & West Elm
Gray blanket- Restoration hardware
Bed skirt- Rachel Ashwell for Target
Purple & black rug- Home Fabrics (Reno, NV)
Jute chenille rug- Pottery Barn
Love print- Made By Girl
Other artwork- DIY by Michaela Noelle Designs. Specific links: Clothespin Bulletin Board Tutorial, Chevron Dresser.
Mercury owl- West Elm
Desk lamp- West Elm
Curtains- Pottery Barn
Chandelier- Z Gallerie
Tree bark colored pencils- World Market
Purple dress- B.P Nordstrom
Shell frame, candles, small bowls, "M" mug- Anthropologie
Cake stand-TJ Maxx
Flower hair clips- Whippy Cake


-photos by Kendra Maarse


Google+ Pinterest