Showing posts with label featured. Show all posts

Revealed: What's Next

Hey guys! I am finally REVEALING the main reason why I haven't been on my blog much.
For those of you who've been with me since the beginning in 2006 - and remember my first post ...it may seem odd that I've been taking such a BIG break from blogging!  But like everything else in life, this too gets a bit boring.  Sometimes we just need a break, a refresher.... to re-think what else we'd like to try & hopefully accomplish in our lives.  So, here's a small look into what I've been working on lately.

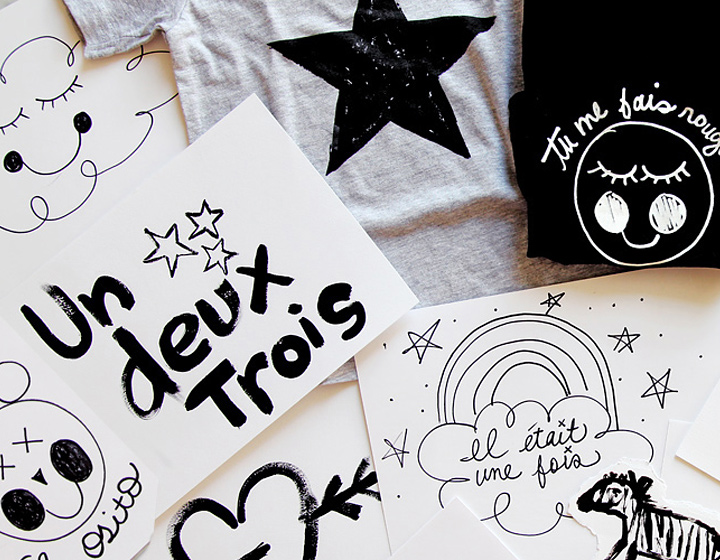
Ever since Noah popped into the mix - I've been thinking more & more about clothing for KIDS.  I LOVE TO CREATE.  I love painting, drawing, designing & coming up with new ideas & concepts. In fact, both of my businesses were about ART that I created for people's homes.  So, after contemplating this for quite some time,  I decided to try my hand at a market that is completely saturated & competitive.  I'm talking about kids apparel. 

Trust me, I realize I am taking a BIG risk in jumping into an industry that is already full of wonderful talent. Even with the same hesitation & fear many of you felt at first... I am ready & here I come!


As I said, this is a NEW market for me.  My head keeps going back & forth between fear & excitement.  I had forgotten what this fear felt like after running my previous business, Made By Girl for over 10 years.  Throughout that time, I remember many women emailing me & asking how they could start their own businesses. They always wondered if they would be able to put aside their own fears & introduce their business ideas to the world.  I often wonder what many of those women ended up doing.  Well, here I am, back at the 'starting line' with another adventure ready to be introduced. 

For me, this is yet another medium to express my art.  I am super EXCITED about these hand-drawn designs for kids tees I created.  I really think other moms will love them too!  The t-shirts are all screen-printed & we will be launching ONLY 8-10 designs to start! We will ACTUALLY be RE-branding the Cocoa & Hearts website & launching it into this new brand. Hope it doesn't cause too much confusion! If you want to know the launch date + news updates -  feel free to sign up to the newsletter here.


I hope you will welcome this NEW & fun kids brand we are launching SOON - from one MAMA to another, THANK YOU in advance!!!!


-images & post by jen ramos
Google+ Pinterest

DESIGN: SASHA BIKOFF

Hey everyone! How are you? It's been raining in New York City today. On rainy days I feel like I could use a bit of color inspiration! I'm sure you could do too... whether it's rainy where you are or not!  I'd like to introduce Sasha Bikoff, she's a young designer whose edgy style is really impressive in today's design scene.  She's known for her bright colors & playful style.

Her unique take on design reminds me of a Barbie's playhouse - with bright colored objects and often times touches of hot pink!  She's only 26 years old & has already been featured on countless blogs... most recently a great spread in Lonny Mag you must see here! These pics will get you started, but def head over to Lonny for more inspiration by this designer.


 -images via sasha bikoff
-post by jen ramos


Google+ Pinterest

Noah's Nursery

For the longest time I always imagined what a nursery would look like.... if I ever had a child. I even wrote about it here after we started the adoption process back in 2014.

When we adopted Noah - I was looking forward to creating a space where he could play, learn & and enjoy. A few days ago we celebrated his Birthday & we also surprised him with his own little space. To be honest, it's a large space that is half my office & half his room. Some people may wonder how this could work....well, since he's on a schedule, I always know what comes next & it's easier to plan my days around his day.  Ok, so let me show you around Noah's room!  I have always loved the idea of neon lights, so I shopped around & quickly realized that neon vendors are very pricey!

So, we found another alternative from a company called Cool Neon. We got the one called High Bright Hella Phat. They actually offer EL Wires that glow when electricity is sent through, but not quite in the same way as neon. Meaning, you won't see it as much in the daylight, but as the sun goes down you'll start to see the neon-look! If you purchase this exact light, you would need the light... plus a driver which can also be bought on the Cool Neon site here. The most important thing to remember when creating your own sign is to measure how much you'd need. The wire doesn't bend easily so write whatever the letters are going to be on some paper. We decided to have it say "you are loved" - and our sign took about 20 feet of neon.


Another reason we chose Cool Neon is because it was very affordable, both battery & electrically operated, can be programmed to blink in patterns & doesn't take training to make the signage. The photos are of the sign in the afternoon - but this photo was brightened to show the neon-look a lot brighter. It isn't as bright as this during daytime. That is the only downfall. Eventually, I'd love to get this in actual neon so I can see it brightly during daylight!

Here is an awesome DIY on How-to-Make a Neon sign using the same El Wire we purchased. We are also happy that we got to collaborate with The Land of Nod for Noah's room. They sent some amazing items our way.  One of the items we wanted for his room were bookshelves... so we could place his collection of kids books. We opted for this straight & narrow book ledge in white from The Land of Nod.  It displays book covers so you can find them easily + you can also use it to display kids art or any wall hangings you may have!  We love how it looks on the wall!


Ever since I was a little girl, I wanted to have a son. Not sure why......I guess it was just my preference.  So, when I saw this 'Boys Rule' print, I wanted it for Noah's space. You can get one from Mini Learners. Thanks to my friend Sarah for gifting it to him. And how about these wooden bow Tie blocks? Adorable right? They're also from the Land of Nod. Noah loves biting on them.

Of course, a baby room must have an area rug that is comfy.  I first bought a wool rug...BIG mistake. It shed way too much, so I returned it.  This one is a soft trellis shag rug from Rugs USA & we love it! It's pretty thick already but we still went for the thickest rug pad from Rug Pads USA.


Here's Noah (above) inspecting the new space from his Babyletto crib. Below you'll see a similar name print to the ABC kids ones I used to sell in my shop. Well, this one was made by my cousin, it incorporates Noah's name throughout the Jeremiah 29:11 scripture. It's perfect. You'll also spot the blue Wobbly Stacker a popular little piece from The Land of Nod along with one of my mini-zebra prints! 


The silver vinyl star decals are such a HUGE part of his space. These removable stars are from Urban Walls and designed by Danielle Hardy. Thanks to Danielle, these are now part of his room. They were easy to put up, all you need is a soft, clean surface! The gray "pull up a pouf" is from Land of Nod & it mixes in with the space quite nicely. It's soft to the touch, but firm and comfy to sit on.


Toy storage is a big deal to us. I can't stand having baby toys all around the house. So, in order to contain them, we decided on the 3 bin palozza from The Land of Nod. As of right now, all his toys are stored away and he can easily access them.


The cutest Zebra Throw pillow sits nicely in his crib. 


This little wooden robot has parts that come off and are placed back on by magnets. Find him and BoConcept.


Below: Here he is when we surprised him on his birthday with his new space! So grateful for moments like these.

 I hope Noah's new space will INSPIRE you to create something beautiful for your baby!


-post & photos by jen ramos


Google+ Pinterest

New Made By Girl ART + New Site!!

Hey everyone!! 

After not adding paintings to the online gallery for a couple months, I have now added some NEW  pieces including several (pre-framed) colors paintings!  I recently painted some art that was inspired by the GORGEOUS carpets I've seen in local shops along with the Morrocan style rugs I love so much! -  These new additions are currently listed as 'Rug Style' - and they have a slight abstract-feel to them.  I love beautiful, colorful rugs and thought this would be a great addition to my online gallery.  Hope you like them!!

NOTE: My apologies.....the pricing on some of the paintings was incorrect & higher than I had requested. Sorry!!!  - That was an accident & the true pricing is now listed for each painting!


p.s - for commissions and any custom pieces you'd like to have me to paint, please email me.


-post by jen ramos


Google+ Pinterest

Kate Spade Home

Have you heard? 

Kate Spade launched a collection of Home decor items & it's super cute! I'm especially fond of the polka dot Downing Desk.  It's so chic & love how it also has three drawers with a lovely brass finish. As they say, pretty things increase productivity.  I agree. Working beautifully is something I enjoy doing. But a little more than I could spend on a desk at this time...but perhaps it would work well for you? Below are a few of my favorites from the Home collection, available directly on the Kate Spade site!


-post by jen ramos


Google+ Pinterest

GIGI NYC : My New Phone case

I have been a fan of GIGI NY for as long as I can remember.  They offer handbags, clutches, phone cases, wallets & more...all made with the highest quality leather.. I really love their brand for many reason, one is, they offer personalization on almost any of their products.  They are super stylish & come in a variety of colors as well!

I recently got an iPhone 6 and wanted a case that would match my personality... but also be functional. I remembered the ones that GIGI NY had and I really loved the this black embossed python one + their iPhone wallets. The wallet cases are super cool & come in a variety of styles & color! I admit, I  was hesitant at first...thinking that my phone would just fall out when I opened it. But no. The phone somehow stays on with a strong piece of velcro, that almost seems like a magnet. But it def holds, so that's good news.  I would highly recommend the wallet cases for all the working women out there.

In case you're wondering,  this is the one I have.

So, thank you to GIGI NY for sending a few pieces my way.  I'm quite happy with my cases. In fact, I've gotten many compliments on my embossed hard shell case when I'm using my new iPhone. If you're in the shopping mood, they are currently having a HUGE sale 30-40% off.  Check them out here.


My iphone case + wallet case


-post by jen ramos
-images of phone cases by jen ramos

Google+ Pinterest

BEAUTY: DIY LIPSTICK PALETTE

Hey everyone! Today, I wanted to share a little something I learned. 

During a photo shoot last year,  I noticed my make-up artist, Mayela Vazquez using a makeup palette with lots of colors for my lips. At first, I didn't know what to think. It looked like a painter's palette and a bit MESSY...Hmmm. I knew she did AWESOME work, so I wondered in silence where she got this palette from. 

When she was finished applying my lip color - I looked in the mirror & WOW! They looked fabulous & smooth! Perfection!  I somehow knew this palette (& her skills) had something to do with this. I asked her where she got the palette from...& this is what I learned from her.


After she told me, I decided to DIY this. So, if you want smooth, neat, long-lasting color..... keep reading.

  • Buy an empty make-up palette.  I bought the 35 well-pro lipstick palette from The Tanning Store.  It has 35 deep compartments, 14 large & 21 medium. This particular palette also includes a white center divider attached with a long hinge. The brand is by MITSUYOSHI. 
  • Purchase several of your favorite lipstick shades. I haven't filled up the palette yet, but I plan to. Right now I have about (12) of my favorite shades. From brands like Nars, Yves Saint Laurent, Burberry, Bobbi Brown, MAC, Givenchy & more. 
  • Once you purchase all the lip color,  add one color at a time by slicing the lipstick into rounds. It's easier this way, trust me. Maybe cut 2-3 rounds at a time into the palette compartment of your choice. The reason for starting off with 2-3 slices of lipstick color is because it is easier to mash the lipstick into the compartment with fewer rounds.  You can use any flat or rounded object to mash the lip color.  This part can get messy if you rush it. So, be patient & make sure your mashing object isn't too large.. 
  • Continue down the lipstick & cut 2-3 more slices off.  Repeat the mashing into the palette. Once a lip color is done, feel free to move onto the next lipstick shade. 
  • Once you have all your colors in the palette - it should look somewhat like mine - you can start testing it out on your lips. 
  • For trying the shades -  I recommend using a lip brush like the Sephora Pro Lip Brush #81 or the Make Up Forever #302 Precision brush.  Folks, using a brush to add color to your lips makes a HUGE difference!!  For one, the lipstick appears to look neater & your lips look more defined. Also, the color seeps into the lines in your lips & that allows the color to remain on your lips longer!!  Trust me, once you try this -  you will not turn back. 
  • A benefit of using a make-up palette for lipstick color is that it allows you to mix & match colors.  I've found that having all my shades available to me (at the same time) makes it easier to blend the perfect color for my lips!
  • Another item I added to my palette was lip gloss. I love Tickled Pink by Lancome it adds the perfect finishing touch to my lipstick!

-post & images by jen ramos

Google+ Pinterest

Nespresso: A Cup Above for Breakfast

One of my favorite things to do on the weekend is have a nice breakfast at home with family... & that includes coffee. There's something special about taking the time to cook & enjoy food together that creates memories.  In this particular case, maybe it's the hot pancakes stacked high, or the warm blueberry sauce dripping off the sides, or maybe it's the crispy bacon on the side.

One thing's for sure, a hot cup of foamy cappuccino with breakfast is always a must! Personally, we love Nespresso.  Not only do they have the best coffees with every level of intensity to suit your tastes, but the VertuoLine Evoluo machine from Nespresso takes it up a notch. The Evoluo makes superb American-style coffee as well as Espresso, and with the centrifuge technology, the rich crema on top makes every cappuccino smooth and frothy even before you add the milk.  In my case, I use soy milk, which is just as tasty. Breakfast without coffee would feel incomplete & I love how the aroma fills our apartment and really peps me up for the day.


If you don't remember,  this past year Nespresso welcomed George Clooney as its new brand ambassador in the U.S. & they launched their new campaign "Experience A Cup Above."  I enjoy Nespresso & their premium, single-serve coffee and if you've never tried Nespresso, it's time to experience 'A Cup Above' and Nespresso's elegant lifestyle - head over to a boutique and try all the different tastes they have until you find the one that's just right for you. Then take it home and create new breakfast memories.

Google+ Pinterest